Getting Real About Paneer Tikka: My Hands-On Kitchen Experience
Talking about my love for paneer tikka goes way beyond just the taste. It’s really about the whole process—marinating those soft paneer cubes and grilling them until they’re perfectly smoky and charred. I’ve been making paneer tikka since 2012, and early on I realized that the secret lies in the marinade and how you cook them, especially if you don’t have a traditional tandoor oven at home. There’s a simple pleasure in skewering those creamy pieces and watching the marinade bubble up and turn golden-brown with just the right amount of char. This guide is packed with tips and tricks I’ve picked up from years of recipe testing and hands-on kitchen experiments. Whether you’re a vegetarian curious about textures or just someone who can’t resist a good grilled snack, these tips should help you nail paneer tikka at home without breaking a sweat.
If you want to bring that street-food vibe into your kitchen without a lot of hassle, you’ll find clear instructions here plus a few subtle tricks I swear by. After cooking paneer tikka for years, I’ve learned there are tiny details that really change the game. Interested in bread to go with it? I’ve got a post on making perfect homemade naan you might want to check out. And if you’re curious about different marinades, I’ve also shared my easy chicken tikka marinade recipe. Alright, let’s dive into what makes paneer tikka such a favorite for so many.
Getting to Know Paneer Tikka
Paneer tikka has been a favorite snack in India for decades, especially in the northern parts of the country. It’s closely tied to Punjabi food culture, where cooking with a tandoor (clay oven) really took off. At its core, paneer tikka is cubes of fresh paneer soaked in a spiced yogurt marinade, then grilled until those edges turn slightly charred. The result? Soft, smoky bites that pack a punch of tangy heat.
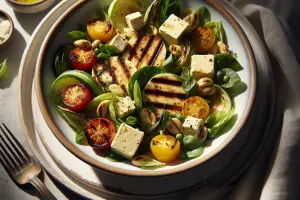
What really grabbed me about paneer tikka is the way the spices hit just right—not too overpowering—and that subtle char that adds a beautiful smoky twist. Unlike rich, saucy dishes, paneer tikka lets the texture of the paneer shine through, keeping things simple yet satisfying. Often, you’ll see it served as a snack or street food, with colorful grilled veggies like bell peppers, onions, and tomatoes threaded on the skewers. Sometimes, it’s a full meal with naan or pulao on the side, making it a hearty choice for vegetarians. I’ll never forget watching those paneer cubes sizzle over the heat, the smoky aroma filling the air—it’s a pretty unforgettable food moment.
Whenever I tuck into this dish at a roadside stall or a little local eatery in India, it sparks this urge to whip it up back home—minus that smoky tandoor flavor. It's surprisingly tasty and even manages to win over folks who usually prefer meat, which I think explains why it's so popular beyond just the vegetarian crowd.
2) Why This Dish Is Worth Making
You might wonder, why bother making paneer tikka at home when you can grab a ready-made pack or order it from your favorite spot? From my experience, homemade paneer tikka has this fresh quality that store-bought versions just don’t match. I still remember trying a popular street vendor's version and thinking, “Hey, I could totally make this myself.” It’s not just about flavor—it’s about having control: dialing the heat just right, picking the freshest paneer, and deciding what kind of yogurt or oil to use. That’s what makes it special.
Over time, I've tried out numerous eateries and spent hours experimenting in my own kitchen, adjusting the spice levels and marinating the paneer just right. Those hands-on moments taught me how even small tweaks can make a big difference. Cooking at home also means you avoid the extra oil and artificial colors that often sneak into restaurant versions. Plus, you get to tailor the dish exactly how you like it—less chili if you have little ones around, or a bit more garam masala if you want that extra punch.
Here’s a little heads-up—making paneer tikka does take some patience. If you’re marinating overnight and then grilling those cubes without drying them out, you really need to take your time. It’s not a dish you want to rush through. Also, it’s a bit on the pricier side for an everyday cook-up. A good quality paneer block will set you back around ₹150-₹200, and then you’ve got to factor in yogurt and spices. But honestly, when you nail it, it’s absolutely worth the effort—perfect for impressing guests or treating yourself on a special night.
3) What You’ll Need to Make It
Getting paneer tikka just right really comes down to your ingredients. First off, the paneer itself – it needs to be fresh and firm. I usually go for about 400-500 grams, whether homemade or from the store. If you’re using store-bought paneer, a little trick I’ve learned is to press it between two plates with a weight of 1-2 kilograms on top for about half an hour. This squeezes out extra moisture, so your paneer grills nicely without falling apart.
For the marinade, I start with about a cup of thick yogurt. Hung curd is my favorite because it’s super creamy – basically yogurt that’s been strained to get rid of the watery whey. But if you don’t have that, Greek yogurt works just fine too. From there, I add the spices that bring the whole thing to life.
- 1 teaspoon garam masala
- 1 teaspoon red chili powder (adjust to taste)
- 1/2 teaspoon turmeric powder
- 1 teaspoon cumin powder
To give it that bright, tangy kick, I use two tablespoons of fresh lemon juice. Then, a tablespoon of ginger-garlic paste adds a fragrant punch. Don’t skip the oil—about a tablespoon of mustard or vegetable oil helps the marinade stick to the paneer and keeps it nice and moist while it grills.
When I’m craving a little nostalgia in my dish, I like to toss in a teaspoon of dried kasuri methi (fenugreek leaves). Sometimes, I sprinkle half a teaspoon of chaat masala right before serving to add a bit of zing. You’ll see some recipes calling for red food coloring to get that bright orange-red look, but I skip that. Instead, I add a pinch of Kashmiri chili powder— it gives a natural, warm color without turning the whole thing fiery hot.
Don’t overlook the basics—salt and pepper. I usually use about 1½ teaspoons of salt and a quarter teaspoon of freshly ground black pepper. It might sound small, but trust me, I’ve tested this recipe plenty of times, and missing or cutting back on either one really changes the flavor. Those little tweaks matter more than you’d guess.
4) Cooking Instructions: Step-by-Step
Getting paneer tikka just right means paying attention to some important details. Here’s how I usually go about it:
I start by cutting the paneer into even cubes, about an inch (2.5cm) on each side. Keeping them the same size helps everything cook evenly—nobody wants some pieces overcooked and others still raw. For a group of 3-4, I usually cut around 400 to 500 grams of paneer this way.
Then comes the marinade. In a big bowl, I mix a cup of thick yogurt with a teaspoon each of garam masala and red chili powder, half a teaspoon of turmeric, another teaspoon of cumin powder, a tablespoon of ginger-garlic paste, two tablespoons of fresh lemon juice, a tablespoon of oil, plus salt and black pepper to taste. I stir it all together until it's smooth and creamy, then give it a quick taste to make sure the flavors are balanced. That tangy yogurt really brings everything together.
Now, time to marinate! Gently fold the paneer cubes into the marinade, making sure every piece gets nicely coated. Cover the bowl with cling film and pop it in the fridge. From trying out several versions myself, I’d say at least an hour’s good, but if you can leave it for 4 hours or even overnight, the flavors really sink in and it tastes so much better.
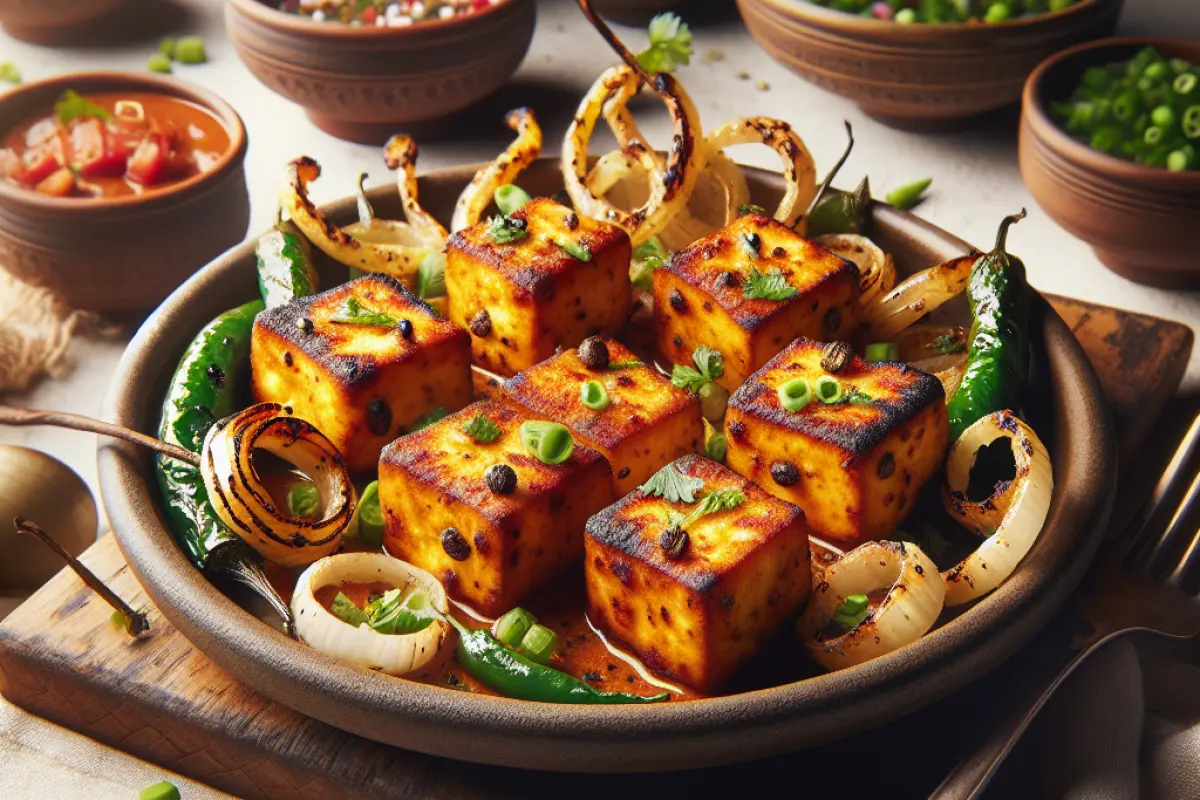
When it’s cooking time, you have a few ways to go about it—stovetop grill pan, oven broiler, outdoor grill, or if you’re lucky enough, a tandoor. I usually reach for my heavy cast iron grill pan, heating it on medium-high, then grilling the skewers for about 6 to 8 minutes per batch. I turn them every 2 to 3 minutes to get those nice char marks without burning. If you're using an oven broiler set at 200°C, it’ll take around 10 to 12 minutes, flipping halfway through.
I’m a fan of metal skewers, but bamboo ones work just fine if you soak them in water for 30 minutes first. Just don’t pack the cubes too tightly on the skewers—give ‘em some breathing room so they cook evenly and get that smoky flavor all around. Also, brushing them lightly with melted butter or ghee while grilling keeps the paneer nice and moist, which makes a big difference.
You'll know your paneer is perfectly cooked when the outside turns a beautiful golden brown with just a hint of char, while the inside stays soft and tender. If it bounces back like rubber or feels tough, you've probably left it on the heat too long.
5) Handy Cooking Tips
Here’s a little nugget from my kitchen: paneer texture really makes a difference. Whether you’re making it fresh at home or buying from a local market, pressing it firmly enough helps the cubes hold their shape on the grill. If it’s too soft, you’re asking for trouble—expect those cubes to crumble or stick to your grill.
I’ve found it’s pretty easy to control the spice level by tweaking the amount of red chili powder in the marinade. Adding just about half a teaspoon of sugar helps balance out the heat and acidity perfectly. If you’re not a fan of spicy food, cutting the chili powder in half still keeps the flavor punchy without overwhelming your taste buds.
Brushing the paneer with butter or ghee while it grills makes a huge difference. I usually keep around 2 tablespoons of melted unsalted butter nearby and swipe it over the paneer every few minutes. This little step locks in moisture, adds a rich creaminess, and brings out that irresistible grilled aroma.
No tandoor? No problem. I’ve got a trick to bring in that smoky flavor at home. After you put the paneer skewers on the grill pan, heat a small piece of charcoal on your stove until it’s glowing red, then place it on a metal bowl or foil next to the pan. Drizzle a teaspoon of ghee or oil over it, then quickly cover the pan. The smoke gets trapped, giving your paneer that smoky kick without needing fancy gear.
I like to throw in some veggies too—usually a large onion sliced into rings and a big bell pepper cut into chunks—right alongside the paneer. They take about the same time on the grill and give a nice mix of textures and flavors that really lift the dish.
6) Different Twists and Swaps
Paneer tikka is pretty flexible. One fun twist I tried was stuffing the paneer cubes with spiced mashed potatoes or a mint-coriander chutney. It takes a bit more time to prep, but that little surprise inside is totally worth the extra effort.
If you’re avoiding dairy, tofu can step in as a pretty good stand-in. Go for firm tofu, press it well to get rid of excess moisture, and treat it like you would paneer by marinating it. I like to toss in a splash of soy sauce and a bit more lemon juice to give the tofu some extra zing since it can be a bit bland on its own.
Halloumi cheese is another option some folks try—its firm texture holds up well on the grill. I’ve made it a couple of times, and while it’s tasty, it’s definitely saltier and has a stronger flavor compared to paneer. It just doesn’t have that soft, gentle bite that makes paneer so delightful.
Air fryers have been gaining traction for their ease of use, so I gave paneer tikka in mine a shot. I set it to 180°C and cooked for about 12 minutes, shaking the basket halfway through. The result was okay—nice and cooked—but it missed that charred, smoky kick you get from grilling over charcoal or an open flame.
If you want to switch things up, try experimenting with different marinades. Instead of the usual yogurt base, go for a makhani-style mix with tomato puree, cream, and a hint of fenugreek—it adds a rich, buttery twist. Or, if you’re in the mood for something fresh and vibrant, whip up a green chutney marinade using cilantro, mint, green chilies, and a bit of yogurt. Both bring a whole new flavor to the dish.
7) How to Serve and Pair Your Paneer Tikka
Paneer tikka is incredibly flexible when it comes to serving. Personally, I love pairing it with a simple green chutney made from fresh cilantro, mint, green chilies, and a splash of lemon juice—it brightens everything up. That tangy kick balances the smoky, spiced paneer perfectly and keeps each bite exciting.
A plate of raw sliced onions sprinkled with chaat masala and a few lemon wedges is an easy way to capture that authentic street food feel. When it comes to serving paneer tikka, I love offering it as a starter on its own, or stuffing it into wraps or pita with fresh cucumber slices and a drizzle of yogurt sauce—perfect for a quick, satisfying bite on the go.
If you’re aiming for a heartier meal, pairing paneer tikka with fragrant basmati pulao or wrapping it in warm butter naan does the trick. I found it pairs wonderfully with drinks like masala chai, a light beer, or a refreshing glass of fresh lime soda. There’s something about the soothing warmth of chai that balances the smoky spices, especially when the evening starts to cool down.
8) Common Pitfalls to Avoid
One thing I’ve learned when making paneer tikka at home is to never crowd your grill or pan. It’s tempting to toss in a bunch of cubes at once, but when they’re packed too tightly, they end up steaming instead of getting that nice, smoky char. Trust me, giving each piece some breathing room makes all the difference.
Another thing to watch out for is using too much oil in your marinade. Too much and your paneer gets all soggy instead of crisping up at the edges. I usually stick to about a tablespoon of oil for every 400 grams of paneer and rely more on yogurt and spices to do the heavy lifting. It keeps the texture just right.
And don’t rush the marinating process. I made that mistake on my first try—after less than an hour, the paneer inside was just bland. Letting it soak for at least an hour (or more if you can) really lets the flavors sink in and makes each bite more flavorful. It’s worth the wait!
Cutting the paneer either too small or too big can throw off the whole cooking process. Tiny cubes tend to fall apart, and if the chunks are too large, they won’t cook evenly all the way through.
Finally, don’t rush the grilling by turning the heat too high. It might char the outside while leaving the inside cold or rubbery. Keeping the heat at medium and being patient really pays off.
9) Storage and Meal Prep Tips
If you're planning to marinate the paneer ahead of time, keep it covered in the fridge and try to use it within 24 hours. After that, the paneer starts to pick up a slightly sour flavor, which isn't the best for your tikka.
You can freeze cooked paneer tikka, but from my experience, the texture changes once thawed—it tends to get crumbly and dry. If you do freeze it, wrap the skewers tightly in foil and pop them in an airtight container. When reheating, go low and slow in the oven at 160°C for about 8-10 minutes, and baste with a bit of butter to keep things moist.
Putting together your skewers a few hours before a party is a smart move. You can marinate them ahead of time, so when it’s showtime, you’re grilling rather than stressing. It makes cooking faster and frees you up to enjoy the party instead of hiding in the kitchen.
10) Dietary Tweaks and Alternatives
If you’re vegan, swapping out paneer for firm tofu is a solid move, though the texture won’t be quite the same. Try using plant-based yogurt or coconut yogurt in your marinade to keep everything dairy-free. And if you’re missing that cheesy punch, a sprinkle of nutritional yeast does the trick nicely.
Gluten can sneak in where you least expect it. The base recipe is usually gluten-free, but watch out for store-bought spice mixes or chutneys—they sometimes hide additives or thickeners with gluten. I usually double-check labels or, better yet, make my own spice blends to stay safe.
If you’re keeping an eye on fat intake, I’d recommend swapping regular yogurt for low-fat Greek yogurt and using a spray oil instead of butter or ghee when cooking. Also, letting the marinade sit longer really helps boost the flavor, making up for that lighter fat content.
If you’re allergic to garlic or onion, no worries—you can skip the ginger-garlic paste and just use fresh ginger. For the onions, try swapping them out with thinly sliced zucchini or mushrooms on your skewers; they add a nice texture and soak up the flavors well.
11) FAQs
Wondering if you can make paneer tikka without yogurt? Yogurt plays a key role in tenderizing the paneer and adding tangy flavor. Without it, your marinade ends up dry and flat. If you’re avoiding dairy, go for a non-dairy yogurt alternative—plain water or oil just won’t give you the same taste or texture.
How long should I marinate paneer? You can marinate paneer anywhere from 1 hour up to a full day in the fridge. I’ve found that letting it sit overnight, around 8 to 10 hours, really brings out the flavors. Just be careful not to go past 24 hours—the texture starts to get a bit mushy if it marinates too long.
No grill pan or oven? No problem! If you don’t have a grill pan or oven, a non-stick skillet on medium heat works fine—you just won’t get that classic char. Pan-frying with a little oil or even a toaster oven can also do the trick. That smoky flavor is tougher to nail without proper grilling gear, but with a bit of patience, you can still get a tasty result.
How to stop paneer from sticking to skewers If you can, use metal skewers—they’re a lifesaver. If you’re using bamboo skewers, soak them in water for at least 30 minutes before cooking. Also, lightly oiling both the skewers and the paneer helps keep things from sticking and makes flipping way easier.
Do you really need food coloring for that classic look? Not at all! Using food coloring won’t change the flavor and honestly, it’s often unnecessary. I’ve found that natural chili powders, like Kashmiri chili powder, do a great job adding a vibrant red hue without any artificial dyes. It’s a simple trick I picked up from local cooks that keeps things authentic and fresh.
Wondering if you can make paneer tikka mild enough for kids? Absolutely. Just cut back or skip the red chili powder altogether. Instead, use something gentler like paprika or even sweet bell pepper powder. To balance things out, try mixing in a little sweeter yogurt or even a touch of honey. It softens the spice and makes it kid-friendly without losing the flavor.
What’s the real difference between paneer tikka and paneer pakora? Well, paneer tikka is all about marinated cubes grilled to smoky perfection. Paneer pakora, on the other hand, is paneer dipped in chickpea flour batter and deep-fried until crispy. Pakora comes out crunchy and golden, while tikka is more about that grilled char and spiced marinade. Two tasty but very different treats!
12) Conclusion
Making paneer tikka at home is something I genuinely enjoy—it takes a bit of patience, but trust me, the flavors make it totally worth it. From picking out fresh, soft paneer to nailing the right marinade and grilling it just right, this recipe gives you plenty of room to play around and savor every spicy, smoky bite. I hope this guide gives you the confidence to whip up paneer tikka for anything from a casual dinner to a special gathering. And hey, if you have your own spin or tips, I’d love to hear about them in the comments!
If you’re into this kind of cooking, you might want to check out my recipe for authentic butter chicken made at home. And for anyone wanting more Indian flavors, don’t miss my step-by-step guide on making easy homemade samosas—it’s pretty straightforward and so satisfying.
Be sure to subscribe to my newsletter for more home-cooked recipes coming your way, and follow me on social media for quick cooking inspo and behind-the-scenes moments. Happy grilling, everyone!
If this topic interests you, you may also find this useful: https://www.cravediary.com/blog/perfect-chocolate-chip-cookies-easy-homemade-recipe-tips