Getting Started with Dal Makhani
I still remember the first time I tasted dal makhani at a tiny Punjabi dhaba tucked into a lively street corner. It wasn’t fancy—a simple wooden table and a steel plate—but the creamy texture and warm, spiced flavors grabbed me right away. Since then, I’ve cooked it countless times at home, and I’ve found the secret lies in patience: slow cooking really lets those flavors develop. If you’re a fan of Indian food or just looking to cook a filling, comforting dish from scratch, this guide will help you make dal makhani step by step. I’m sharing everything I’ve learned—from handy tips to easy tweaks—so you can get it just right in your own kitchen.
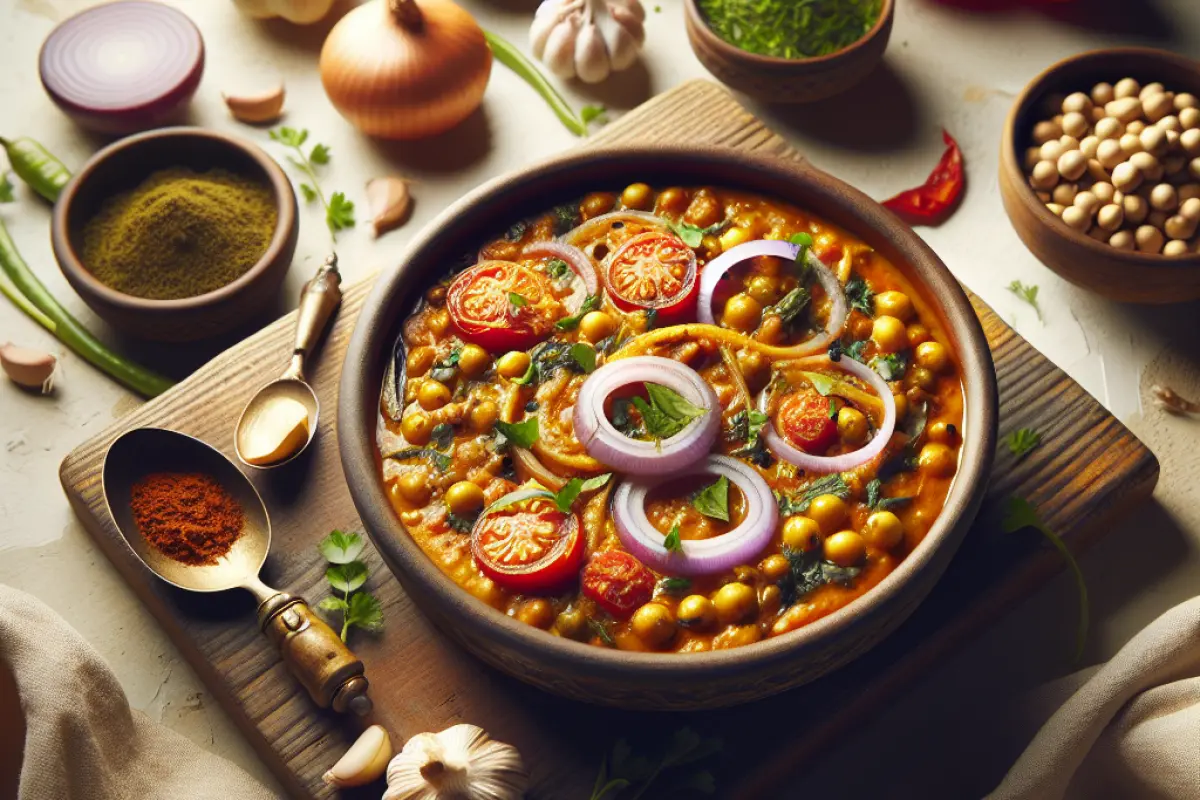
Why Dal Makhani Stands Out
Dal makhani is truly one of those dishes that feels like a warm hug from North India. It’s been a favorite in Punjabi homes and restaurants for as long as I can remember. What makes it special is the creamy texture of slow-cooked black lentils, mingled with aromatic spices that create a rich, comforting flavor. Unlike your regular dal, dal makhani has this subtle smoky note and a buttery richness that just melts in your mouth. It’s the kind of dish you can dig into during celebrations or even just to treat yourself on a quiet evening. Trying my hand at making it taught me a lot about the patience that goes into traditional Indian cooking and how flavors gently deepen over time. Trust me, this dish is worth the wait and effort if you want a true taste of Indian comfort food.
What You’ll Need
So, here’s the list of ingredients for about 4 to 5 servings:
- 1 cup whole black urad dal (split black gram)
- ¼ cup rajma (red kidney beans)
- 3 medium ripe tomatoes, pureed (about 350g)
- 3 tablespoons unsalted butter (you can adjust later)
- 100ml fresh heavy cream (or substitute as mentioned below)
- 2 medium onions, finely chopped
- 4 cloves garlic, minced
- 1-inch piece fresh ginger, grated
- 2 green chilies, slit lengthwise (optional)
- 1 teaspoon cumin seeds
- 1 teaspoon garam masala
- 1 teaspoon red chili powder (adjust based on heat preference)
- 1 teaspoon coriander powder
- ½ teaspoon turmeric powder
- ½ teaspoon dry fenugreek leaves (kasuri methi)
- Salt to taste
- 3 tablespoons vegetable oil or ghee
- Fresh coriander leaves for garnish
Getting good-quality lentils and fresh spices makes all the difference. I usually pick up urad dal and rajma from my local Indian grocery store—whole urad dal runs about ₹150 per kilo, while rajma is around ₹120. I steer clear of pre-ground spices because freshly ground ones bring that unbeatable, fresh aroma you just can’t get otherwise. If you're tight on time, canned rajma works fine, but dried beans soak up flavors way better and give you a firmer bite. If you can’t find these lentils nearby, black turtle beans are a decent substitute, or you could use all urad dal, but keep in mind the taste will change a bit.
How to Cook: Easy Step-by-Step Guide
Soaking and Preparing Lentils
Start by rinsing 1 cup of urad dal and ¼ cup of rajma thoroughly under running water. Then soak them in about 4 cups of water overnight—at least 8 hours if you can. Trust me, this step really makes a difference. I once tried cutting corners by soaking for just a couple of hours, and even after cooking, the lentils came out grainy and tough. Soaking softens them up and helps speed up the cooking process, which you'll appreciate later.
Cooking the Lentils
After soaking, drain the lentils and rajma well. Toss them into a pressure cooker with 4 cups of fresh water and a teaspoon of salt, then bring it up to pressure. Cook for around 25 to 30 minutes on medium heat—that’s about 8 or 9 whistles. No pressure cooker? No worries. You can simmer them on the stovetop in a Dutch oven for 1.5 to 2 hours, just keep an eye on the water level and add more as needed. I usually go with the pressure cooker because it’s quick, but if you have the time, slow cooking gives you a beautifully creamy result that’s worth the wait.
Making the Spice Base
While the lentils are simmering away, heat up 3 tablespoons of oil or ghee in a sturdy pan over medium heat. Toss in a teaspoon of cumin seeds and wait for them to start crackling—that’s when the real flavor begins. Next, add two finely chopped onions and let them cook slowly until they turn a rich, golden brown. This takes around 10 to 12 minutes, but trust me, the patience pays off. That slow cooking draws out the onions’ natural sweetness, which perfectly balances the slight tang of the tomatoes later on.
Once the onions are golden, stir in four minced garlic cloves and a thumb-sized piece of grated ginger. Let it cook for a couple of minutes until you catch that warm, spicy aroma filling the kitchen. If you like a bit of a kick, slice up two green chilies and add them in. Then pour in the tomato puree and keep it on low heat for about 15 minutes, giving it a stir every now and then. This slow simmer helps the tomatoes lose their raw edge and really concentrate the flavors—bringing the whole dish together beautifully.
Spices and Lentils: The Heart of the Dish
Next, stir in a teaspoon each of turmeric, red chili, and coriander powders, along with about a teaspoon of salt—adjust to your taste. Give it a good mix and let it cook for another five minutes. By now, your lentils should be perfectly cooked. Pour them into the spiced onion-tomato mix, including any leftover cooking water; you’re aiming for a thick, comforting texture.
Turn the heat down low and let everything simmer gently for about 30 to 40 minutes. Make sure to stir every 10 minutes so nothing sticks to the bottom. Halfway through, add three tablespoons of butter and 100ml of heavy cream—this is the secret behind dal makhani’s rich, velvety texture. If it starts looking too thick, just splash in some hot water until it’s just the way you like it.
Adding That Smoky Kick
The smoky flavor in dal makhani traditionally comes from a technique called “dhungar.” I gave it a few tries in my kitchen: you heat a small piece of charcoal until it's glowing red, then pop it into a little metal bowl or foil cup. Place that right in the middle of your pot of dal, pour a spoonful of ghee over the hot charcoal, and quickly cover the pot to trap all the smoky goodness. After about five minutes, take out the charcoal and stir everything together. It adds a subtle, smoky note that’s tough to get any other way, though if you’re not up for the extra step, it’s not a dealbreaker.
Cooking Tips You’ll Actually Use
Why Slow Cooking Makes a Difference
Wondering why you have to wait so long during that final simmer? Well, dal makhani isn't just about tossing ingredients together—it’s about giving everything time to meld and develop real depth. Cooking it slowly on low heat breaks down the lentils until they’re perfectly tender and lets the spices and creamy richness shine through. I always make sure to simmer it for at least 30 minutes after adding butter and cream. Trust me, skipping this slow-cooking step means you end up with a bland, flat dish—and I’ve learned that lesson firsthand.
Common Mistakes to Avoid
One thing to watch out for is the texture. Overcooked lentils with not enough liquid can dry out, while undercooked dal turns rubbery and unpleasant. The goal is a thick yet spoonable consistency that’s just right. Another pitfall I’ve noticed is going heavy on tomato puree or acidic spices—it can cause the cream to curdle or overpower the buttery flavors that make dal makhani so comforting. My tip? Use tomatoes and spices in moderation to keep everything balanced and smooth.
Balancing the Spices
Everyone’s taste buds are different—when I cooked this dish for friends, some wanted it spicier while others preferred it milder. I usually start with one teaspoon of red chili powder and add more if needed. Kasuri methi, those dried fenugreek leaves, bring a subtle bitterness that really balances the creamy richness and makes the flavor feel authentic. And don’t skip the fresh cream and butter—they’re what give it that luxurious, silky texture. I’ve tried non-dairy swaps, but they tend to change the dish’s character quite a bit; I’ll share more about those options below.
Finding the Perfect Texture
Some folks like their dal makhani thick, almost like a stew, while others prefer it a bit thinner so it goes well with rice or bread. What worked best for me was adding water little by little while it simmers and stirring regularly to keep it smooth. I like it thick enough to cling to a spoon but still soft and comforting—that way, it’s just right whether you’re dipping or spooning.
Adjusting Ingredients Without Losing Flavor
Healthier Versions
Here’s a little trick I picked up when I want something creamy but a bit lighter: swap out half the cream for plain yogurt—about 50ml of each does the trick. Just make sure the yogurt’s at room temp so it doesn’t curdle when you add it in. I also cut down on butter, using just a tablespoon instead of a handful, which makes the dish feel less heavy but still comforting. It’s my go-to when I’m craving something rich but don’t want to overdo it.
Vegan Dal Makhani
If you're skipping dairy, like some friends of mine, switching out cream and butter isn’t complicated. I’ve found coconut cream—about 80ml—gets that silky, creamy vibe going, and swapping butter for vegetable oil or vegan margarine keeps things smooth. The flavor changes a bit, sure, but as long as you keep your spices and let everything simmer slowly, the dish still tastes just right.
Regional Flavors and Personal Touches
For me, kasuri methi is a must-have—it adds that unmistakable smoky, earthy kick. But if you're feeling adventurous, try throwing in a pinch of smoked paprika or dialing up the red chili for some extra heat. Some cooks like to finish with a sprinkle of garam masala to give the dish a cozy warmth. I remember my Punjabi friends insisting on a teaspoon of jaggery to soften the tanginess—tried it myself, and honestly, it works surprisingly well.
Speedy Recipes for When You’re Short on Time
Sometimes, life throws a tight schedule your way. Using canned rajma and lentils can save you the hours usually spent soaking and cooking, though the dal turns out a bit softer and less textured. Another trick I’ve picked up? Prepare the masala base in advance, freeze it for up to two weeks, and then just mix it with some cooked or canned lentils when you’re ready to eat. Sure, it won’t have that deep, slow-cooked flavor, but honestly, it’s way better than skipping the dish altogether on a busy day!
How to Serve and Enjoy
Classic Side Dishes
Dal makhani goes perfectly with garlic naan, jeera rice, or simple steamed basmati rice. My personal favorite is pairing it with basmati rice—it’s a classic combo for a reason, comforting and satisfying every time. And the best part? You can whip up a wholesome meal like this at home for just ₹100-₹150 per serving, which makes it a great option when you want something tasty without breaking the bank.
Perfect Side Dishes to Try
Adding a tangy pickle, cooling cucumber raita, or a fresh salad like kachumber really lifts the whole meal. These sides cut through the richness of the dal and bring freshness to every bite. I’ve often found that a quick squeeze of lemon right before serving adds a lively zing that pulls everything together beautifully.
Serving Tips for Guests and Family
If you want to wow your guests, try topping your dal makhani with a little swirl of fresh cream and a sprinkle of chopped coriander or a few fenugreek leaves. I like to serve it in a warm, shallow bowl that really shows off its rich, creamy texture—trust me, it makes everyone eager to grab a spoon!
Mistakes to Watch Out For
Skipping Soaking
Trust me, skipping the overnight soak is a rookie mistake—you'll end up with lentils that are either undercooked or oddly textured. Let them soak; it doesn’t take much effort or cost anything extra, but it saves you from a lot of kitchen frustration.
Cooking Lentils: Too Much or Not Enough?
Don’t just rely on the clock—grab a lentil and taste it as you cook. If they get mushy, you’ve gone too far; if they still have a bit of a bite, they need more time. The goal is tender lentils that hold their shape, not a sloppy mess or a chewy handful.
Excess Acidity
If you dump in too many tomatoes or raw spices, they can easily overpower the cream and butter you've carefully added. I’ve found that sticking to about 350g of tomato puree and letting it simmer for a good while helps mellow out that sharp acidity and keeps the flavors balanced.
Rushing the Simmer
Honestly, I can’t say this enough: letting the dish simmer slowly on low heat for the final 30 to 40 minutes is what really ties everything together. It’s a test of patience, but trust me, it pays off big time with richer, deeper flavors.
When There's Too Much Cream or Butter
Those rich ingredients really boost the flavor, but going overboard can leave your dal feeling heavy and greasy. I usually start with the recipe’s suggested amounts and tweak from there—sometimes cutting the butter by half if I want something a bit lighter.
Smart Storage and Meal Prep
How to Refrigerate Dal Makhani Properly
If you have leftovers, pop them into an airtight container and refrigerate—they’ll keep well for up to three days. When you’re ready to enjoy them again, heat gently over low heat with a splash of water or cream. This little trick keeps the dal from drying out or turning grainy, so it tastes just as comforting as when you first made it.
How to Freeze Dal Makhani
Dal makhani actually freezes really well—up to a month in the freezer. Just divide it into containers that seal tight, leaving a bit of space at the top for expansion. When you’re ready to eat, thaw it overnight in the fridge and warm it slowly on the stove. Adding a knob of butter while reheating makes all the difference, keeping it rich and creamy like fresh.
Reheating Tips
When reheating dal, keep the flame low and stir often to keep it smooth and creamy. I’ve found that zapping it in the microwave in short bursts tends to dry it out or makes the cream separate, which is no fun. Taking your time with slow reheating really helps keep that rich texture and full flavor alive.
Make-Ahead Ideas
If you’re cooking dal makhani for a dinner party or a hectic weeknight, go ahead and make it a day ahead. Honestly, the flavors get even better after resting overnight. Just be sure to warm it up gently, and give it a quick taste before serving—you might want to tweak the seasoning a bit to freshen it up.
Dietary Tips and Tweaks
Naturally Gluten-Free Goodness
Dal makhani itself is naturally gluten-free, but it’s always smart to double-check the spice mixes or any store-bought ingredients you use—sometimes hidden gluten can sneak in during processing.
Vegan Adaptations
Like I mentioned before, you can swap out cream for coconut or cashew cream and replace butter with oils or vegan options. I’d suggest trying a small batch first to see if you like the flavor before making a big pot. It makes all the difference!
Low-Fat Alternatives
I like to swap in low-fat yogurt and cut back on butter when cooking. Sure, the dish loses a bit of that rich, velvety feel, but if you get the spices just right, the flavor still hits the spot.
Allergen Notes
Some recipes call for nuts or dairy, which are easy to miss if you have allergies. If you’re allergic to nuts like cashews, skip the cashew cream or nut-based toppings altogether and try using coconut milk or cream instead—they add a nice, subtle richness.
FAQs
Wondering if you can use just one type of lentil instead of both urad dal and rajma? You can, but traditional dal makhani relies on both for good reason. Urad dal brings that creamy texture, while rajma adds a satisfying bite. Using only one will change how the dish feels and tastes, so keep that in mind if you want the full experience.
How long does dal makhani last in the fridge? Dal makhani stays good for about three days when stored in an airtight container in the fridge. Interestingly, the flavor actually gets richer after sitting for a day or so, making leftovers even tastier.
Is it necessary to pressure cook the lentils? You don't have to pressure cook the lentils, but it definitely speeds things up. If you simmer them on the stove, expect to spend about 1.5 to 2 hours waiting for them to become tender. Pressure cooking cuts that down a lot, which comes in handy when you’re hungry and short on time.
What can I substitute for cream if I don’t have any? If you don’t have cream, plain yogurt (at room temperature) or coconut cream are good stand-ins that keep the dish rich and smooth. That said, heavy cream still gives dal makhani that classic, velvety texture you’ll want if you’re aiming for authenticity.
How can you get that smoky flavor if you don't have a traditional clay pot or charcoal? Well, you can try smoked paprika or a few drops of liquid smoke, but honestly, it just isn't quite the same. The classic way is the "dhungar" method, where you use charcoal to infuse that authentic smoky aroma. It's a bit of a hassle but adds a depth to the dish that's hard to beat—though it's definitely optional if you're in a pinch.
Can you make dal makhani in a slow cooker? Definitely! Start by cooking the soaked lentils and rajma until tender, then toss them into your slow cooker with the spiced tomato base. Let it simmer on low for around 6 to 8 hours, stirring in cream and butter towards the end so the flavors stay fresh and rich without getting too heavy.
Want to make dal makhani lighter but still full of flavor? Try cutting back on the butter and cream, and swap some of the cream for yogurt—that adds creaminess without weighing it down. You can also bump up the spices a bit to keep things lively and balanced; it’s a simple tweak that keeps the dish tasty without the guilt.
Conclusion
Making dal makhani from scratch takes time, but it’s absolutely worth it. Once you get the timing right, you’ll be rewarded with those rich, smoky flavors and a comforting warmth that makes any meal feel like home. If you enjoy dishes that get better the longer they cook, this one’s a must-try. I’d say give this recipe a shot, make it your own by adjusting spices to your liking, and savor the simple magic of Indian home cooking. No fuss, just real, tried-and-true steps that really work.
If you're curious about more Indian classics, you might want to check out my posts on making perfect Punjabi chole at home, or a detailed guide on authentic butter chicken. Both are great next steps if you want to explore more hearty, comforting flavors in your kitchen.
Don’t forget to hit subscribe for more straightforward Indian recipes, and follow me for easy, practical cooking tips coming your way. Happy cooking—and enjoy every delicious bite!
If this topic interests you, you may also find this useful: https://www.cravediary.com/blog/complete-guide-to-protein-smoothies-recipes-benefits