Getting Started with the Best Sabzi Recipe
Honestly, I didn’t give much thought to sabzi until I started cooking regularly at home about ten years ago. I still remember those first attempts—grabbing whatever fresh veggies were at the market, throwing in some spices, and crossing my fingers that the dish wouldn’t turn out bland or watery. But as I kept experimenting, I realized just how flexible sabzi can be. It’s not just a simple side dish; it’s comfort food that can bring life to any meal. Plus, it’s packed with nutrients and shows how straightforward Indian cooking really is when you get the hang of it. This guide shares what I’ve learned through countless tries—real tips and tricks to help you whip up sabzi dishes that are both tasty and satisfying. Whether you’re just starting out or looking to improve your home-cooked meals, stick around—you’ll find some hands-on advice here.
Why This Sabzi Recipe Stands Out
Sabzi is such a staple in Indian kitchens, isn’t it? It’s not just about cooked veggies—it’s that everyday dish that pairs perfectly with roti, rice, and dal. When the sabzi comes out just right—not too dry, not greasy, and spiced just enough—it can really make a simple meal feel special. What I love is how flexible sabzi can be; you swap in whatever veggies are fresh or local, and you still end up with something comforting and satisfying. Over time, I’ve found that having a go-to sabzi recipe is a game-changer. It’s my reliable, no-fuss option when I want something homemade that hits the spot every time.
Ingredients You’ll Need
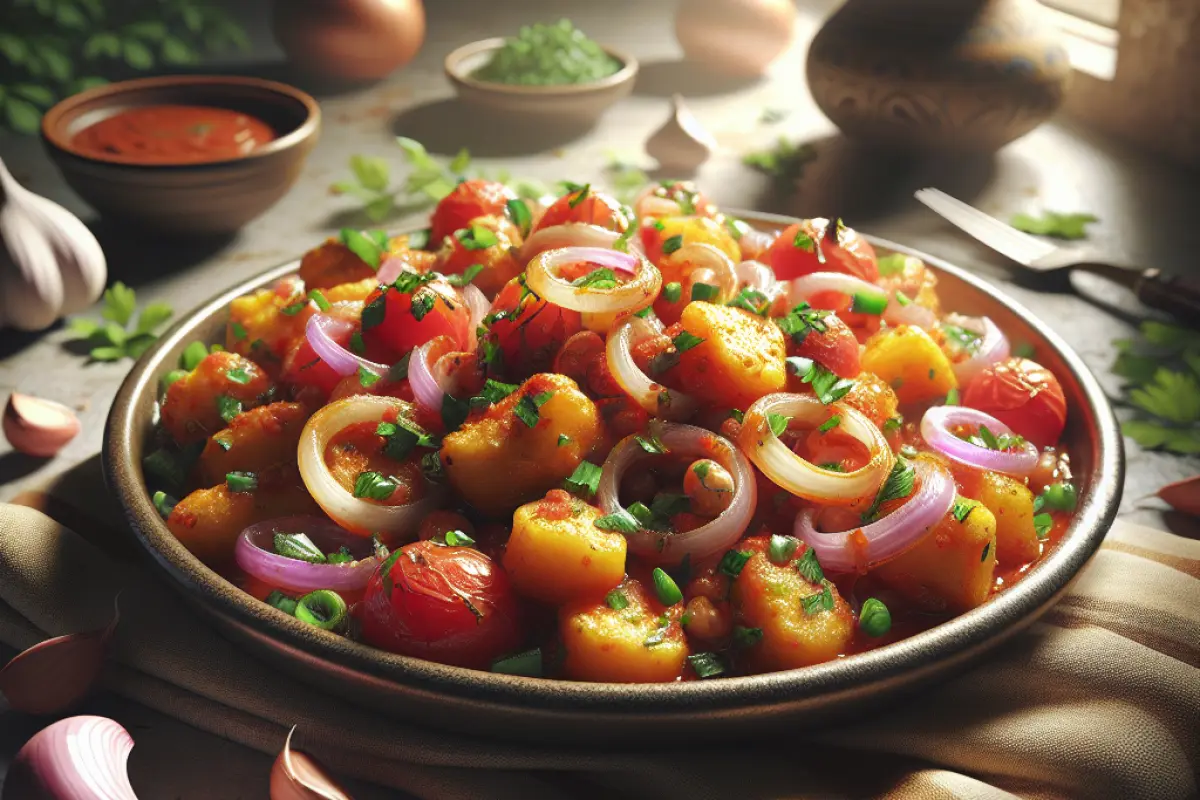
For this sabzi recipe, here’s what I suggest you gather before you start cooking:
- 2 medium-sized potatoes, peeled and diced (about 300g)
- 1 cup diced carrots (150g)
- 1 medium green bell pepper (capsicum), chopped
- 1 cup cauliflower florets (100g)
- 2 medium onions, finely chopped
- 3-4 cloves garlic, minced
- 1-inch piece of ginger, grated
- 2 medium tomatoes, pureed or finely chopped
- 1-2 green chilies, slit (optional)
- 2 tablespoons mustard oil or vegetable oil
- 1 teaspoon cumin seeds (Jeera)
- 1/2 teaspoon turmeric powder
- 1 teaspoon coriander powder (Dhania)
- 1 teaspoon garam masala
- 1/2 teaspoon red chili powder, adjust as per taste
- Salt, as needed (about 1 teaspoon)
- Fresh coriander leaves for garnish, chopped
I’m a big believer in starting with good ingredients. Fresh veggies from your local farmer’s market or organic store just taste better—and they hold up well when you cook them. If you can find mustard oil, give it a try; its unique aroma really adds something special, though plain vegetable oil works just fine. I like to keep things seasonal too—swap out carrots for pumpkin in winter or toss in green beans and peas when spring arrives. One little trick I swear by is adding a teaspoon of crushed dried Kasuri methi (fenugreek leaves) near the end of cooking—it brings a subtle, herby aroma that brightens up the whole dish. And don’t skimp on the spices; fresh coriander and cumin powders, ideally ground from whole spices bought from a reliable source, can make a surprising difference.
How to Cook It Step-by-Step
Here’s how I make this sabzi—after trying it out a bunch of times at home, I figured out the best way to keep it tasty without any fuss. Let me take you through it, step by step.
- Prep all your vegetables: Dice potatoes and carrots into roughly 1-inch cubes, chop bell pepper and cauliflower into bite-sized pieces. Finely chop onions, garlic, and ginger.
- Heat 2 tablespoons of mustard oil in a heavy-bottomed pan or a non-stick skillet over medium heat. Mustard oil often costs between ₹80-120 for 250 ml, but I find the flavor worth it.
- Once hot, add 1 teaspoon cumin seeds. Wait for them to sizzle and sputter—this releases the essential oils.
- Add the chopped onions and sauté for 5-7 minutes until they turn translucent and start to brown slightly. This step develops the base flavor, so don’t rush it.
- Stir in the minced garlic and grated ginger, cook for 1-2 minutes till fragrant but not burnt.
- Mix in your pureed tomatoes, 1/2 teaspoon turmeric, 1 teaspoon coriander powder, and 1/2 teaspoon red chili powder. Cook this masala base for roughly 7-8 minutes, stirring occasionally, until oil starts separating on the sides.
- Add chopped vegetables—potatoes, carrots, cauliflower, and bell pepper. Toss everything well to coat with the spices.
- Sprinkle in about 1 teaspoon salt and pour in 1/4 cup water to help cook the vegetables gently. Cover and simmer on medium-low heat for 20 minutes, stirring occasionally.
- After 20 minutes, check the vegetables for tenderness with a fork. If still hard, add a few tablespoons of water and cook 5-10 minutes more.
- Once veggies are tender, stir in 1 teaspoon garam masala and chopped coriander leaves. Cook uncovered for 2-3 minutes to reduce any excess moisture.
- Taste and adjust salt or spice if needed. Let the sabzi rest for 10 minutes before serving—it allows flavors to settle.
I like to use a heavy-bottomed pan because it stops the food from burning and helps everything cook evenly. Every now and then, I switch things up and reach for my trusty cast iron skillet or a stainless steel kadai. Paying close attention here really makes a difference—you can actually smell the transformation as the onions soften and sweeten, the spices release their fragrance, and the vegetables start to tenderize. Once you get the hang of it, you'll know exactly when the sabzi has hit that perfect spot.
Smart Cooking Tips
I've found that roasting cumin seeds before tossing in onions changes the whole game. It brings out this deep, smoky flavor that just doesn't happen with regular sautéing. When it comes to your spice tempering or tadka, timing is everything—once those seeds start popping, throw in the aromatics right away so nothing burns. And a quick tip for your veggies: cut them into similarly sized pieces. That way, they all cook at the same pace and you won’t end up with some mushy bits alongside crunchy chunks.
The toughest part is keeping the veggies from turning soggy. I've watched plenty of home cooks dump in too much water and end up with a mushy mess. The key? Use just enough water to steam the veggies gently, not stew them. Cook covered on a gentle simmer instead of cranking up the heat to a boil. A medium-low flame keeps everything tender without drying it out. Getting the balance between sweet, salty, and spicy is just as important. Adding some tomatoes and a pinch of sugar really helps tame the acidity and smooth out the heat. Skip the sugar, and your sabzi might end up tasting a bit flat or too sharp, depending on how tart those tomatoes are.
After trying this recipe a bunch of times, I've picked up some handy tips that make it easier for anyone cooking at home to get it just right:
- Use mustard oil or vegetable oil with high smoking points.
- Roast whole spices separately if preferred for a more pronounced flavor.
- For a fresher touch, add a squeeze of lemon juice just before serving.
- Avoid overcrowding the pan to prevent steaming instead of sautéing.
Variations and Swaps
If you’re vegan or need gluten-free options, you’re in luck—this sabzi recipe skips dairy and gluten altogether. But feel free to swap out vegetables depending on what’s fresh or sitting in your fridge. Flexibility is the beauty of this dish!
- Swap potatoes and carrots for winter squash or sweet potatoes in colder months.
- Add peas and green beans for extra texture.
- For a South Indian twist, add curry leaves and mustard seeds instead of cumin for tempering.
- Use coconut oil for a different aroma, especially if you want a coastal flavor vibe.
Don’t have garam masala on hand? No problem. Just mix together half a teaspoon each of ground cinnamon, cloves, and black pepper. For a little extra depth, try adding a pinch of asafoetida (hing). Want it creamier? Stir in a couple of tablespoons of cream or coconut milk at the end, though it’ll give the dish a slightly different vibe from the traditional version.
How to Serve and What to Pair
Now, let’s chat about how I like to plate this sabzi. My go-to is usually hot chapatis or simple steamed basmati rice—both help soak up all those delicious flavors. Pairing it with dal tadka is another favorite; the mild, earthy lentils balance the spices perfectly. On a regular weekday, I keep it simple with roti, sabzi, and a side of cooling yogurt—it’s satisfying without being heavy. But if you’re hosting or want to jazz things up, throw in some tangy pickle (achar) and fresh coriander chutney on the side. It really takes the meal up a notch.
Presentation might sound fancy, but it makes a difference, especially when friends are over. I like to finish the sabzi with a sprinkle of fresh, finely chopped coriander and sometimes a pinch of toasted cumin seeds—it adds a subtle warmth. A lemon wedge on the side doesn’t just brighten the plate but also gives a little zesty kick when squeezed. And if you want to go all out, a handful of crispy fried onions on top adds a crunchy texture that's hard to beat.
Mistakes to Watch Out For
Ever wondered why your sabzi sometimes ends up watery or bland? It’s a common snag for those just starting out. One big culprit is overcrowding the pan. When you pile too many veggies in, they release moisture and steam instead of sautéing, resulting in a soggy mess. I’ve learned the hard way that cooking in smaller batches really saves the texture and flavor.
Another key trick is getting your spice tempering right. If the pan’s too hot, your spices burn and turn bitter. Wait too long and the flavors barely come through. I usually heat my oil until it’s shimmering but not smoking, then quickly toss in the cumin seeds and onions to wake up those aromas without a hitch.
One step many overlook is letting the sabzi rest after cooking. Cover it and give it about 10 minutes off the heat—it's a small pause that really helps the flavors blend and the texture settle just right. I never skip this; it’s like giving your dish a moment to catch its breath.
Taking a little extra time and care with these small details really makes a difference—you’ll end up with a dish that tastes noticeably better.
Tips for Storing and Reheating
I usually keep leftover sabzi in a sealed container in the fridge and try to finish it within two days. After that, the flavors start to fade and the texture gets a bit mushy. When reheating, I prefer doing it gently on the stove over low heat—microwaving tends to make it taste dull and can overcook the veggies. If the sabzi looks a bit dry, a splash of water while warming it up helps bring back that fresh feel.
Freezing sabzi isn’t usually my first choice since the veggies often turn mushy after thawing—thanks to all that water inside them. But if you’re looking to meal prep, here’s a trick: cook the vegetables just a bit less than usual, then finish cooking them fresh on the day you plan to eat. It keeps the texture much better and the flavors still fresh.
If your schedule’s tight, making a big batch of sabzi and dividing it into portions for a couple of days can be a real time-saver. Just be careful not to overcook it the first time around. Keeping it slightly underdone helps preserve that vibrant taste, so your meals don’t end up dull by day two or three.
Dietary Tips and Adjustments
This sabzi is naturally both vegetarian and vegan, which makes it super easy to enjoy no matter your diet. If you’re watching your oil intake, try cutting it down to just a tablespoon or cook it in a good non-stick pan to keep things from sticking. And if mustard oil isn’t your thing—it can be a bit sharp for some—swap it out for a milder vegetable oil. Your stomach will thank you!
If you have gluten sensitivity, steer clear of any pre-made spice mixes that could sneak in fillers like flour. It's best to stick with straightforward spices—think cumin, coriander, and chili—fresh and simple. Want to tone down the heat for kids or sensitive taste buds? Just leave out or cut back on the green chilies and red chili powder. Easy adjustments that make a big difference.
FAQs
So, which veggies make this sabzi really shine? Root veggies like potatoes and carrots are winners, along with cauliflower and bell peppers for some crunch and color. Depending on what’s fresh, you can switch things up—peas, green beans, or even squash work great when they’re in season. It’s all about playing with what’s local and fresh.
Can I make this sabzi ahead of time? Absolutely! You can cook it a few hours before and just warm it up gently when you're ready to eat. Fresh is always best, but if you have leftovers, it keeps well in the fridge for a day or two without losing its charm.
How do I adjust spices if I don’t have certain ingredients? No worries if you're missing garam masala—try mixing a pinch of cinnamon, cloves, and black pepper to get that warm, spicy kick. And if you don’t have chili powder, fresh green chilies can do the trick, but add them slowly so it doesn’t get too fiery.
What’s the best oil to use for authentic flavor? Mustard oil brings that punchy, slightly sharp aroma you often find in North Indian dishes. If you can’t get it, vegetable or sunflower oil works just fine—it won’t steal the show but will still cook your sabzi perfectly.
Want to keep your sabzi from turning into a watery mess? Easy—just don’t add too much water while cooking and keep the heat on medium-low. Also, avoid crowding the pan; if you toss everything in at once, the veggies end up steaming instead of sautéing. If you’re making a bigger batch, cook in smaller portions to keep that nice texture.
Wondering if this dish is beginner-friendly? Definitely! Just pay close attention to tempering the spices and timing how long you cook your veggies. It might take a couple of tries to get it just right, but stick with it—you’ll be pleasantly surprised.
Thinking of doubling the recipe for your whole crew? Go for it! Just remember to use a bigger pan so everything has room to cook properly, or split it into two batches. This way, your sabzi won’t turn soggy and will keep that perfect texture.
Conclusion
All in all, this sabzi recipe strikes the perfect balance between being simple and bursting with authentic flavor—just what you'd want for a fuss-free Indian meal. It's easy enough for home cooks to whip up but becomes truly satisfying when you pay attention to the little details. I’d definitely recommend giving it a go, swapping in your favorite veggies or spices to make it your own. Plus, sharing your twists and tips makes cooking it even more fun for everyone in our foodie circle.
If you’re someone who values straightforward, no-nonsense recipes based on real kitchen experience, this one’s for you. Give it a shot, tweak it until it suits your taste buds, and most importantly—have fun while you’re at it.
If you’re interested in simple Indian dishes, you might also like these posts: “5 Quick Weeknight Dal Recipes to Keep You Sane” for busy evenings, and “How to Perfect the Classic Aloo Paratha” if you want to nail side dishes that everyone loves.
If you want more tried-and-true recipes from my kitchen, make sure to subscribe. And don’t forget to follow me on social media where I share handy cooking tips, little tricks, and sneak peeks of new dishes I’m working on. There’s some exciting stuff coming up, and I’d hate for you to miss out!
If this topic interests you, you may also find this useful: https://www.cravediary.com/blog/creamy-delight-best-homemade-ice-cream-recipe-guide