Getting Started with the Best Paneer Tikka Recipe
I first discovered paneer tikka on one of those chaotic weeknights when I needed something quick but still packed with flavor. Between work and home life, finding time to cook can be tough, so I love dishes that taste like they came from a restaurant but don’t take forever. Paneer tikka fits that bill perfectly—it's not just a tasty appetizer, it can easily be the star of your meal. Pair it with some warm naan or a simple salad, and you’ve got a complete dinner. If you enjoy cooking or just want a dependable recipe for delicious paneer tikka, this guide has you covered. I’ve tested it in my own kitchen, tweaked it a few times, and gathered tips to help you avoid common mistakes, making this as straightforward as possible.
Why Paneer Tikka Deserves a Spot on Your Plate
Paneer tikka has been a staple in Indian kitchens, especially up North, where these grilled, spiced paneer cubes are a popular vegetarian twist on meat kebabs. What really makes paneer tikka stand out is that smoky, charred flavor paired with a marinade that turns simple fresh paneer into something really special. You’ll find it everywhere—from bustling street stalls to cozy family restaurants, and it’s a must-have during festivals. I’ve served paneer tikka to guests and sometimes whip it up on busy weeknights when I want something quick but impressive. After messing around with different marinades and cooking styles over the years, I think I’ve nailed a recipe that hits the right balance between flavor and texture. It’s easy enough to make at home but still has that complex, layered taste you’d expect from a restaurant. If you’ve ever wondered why paneer tikka is such a big deal in vegetarian dishes or want to master it yourself, you’re in the right spot.
What You’ll Need
To start, grab about 400 grams of firm paneer. I usually go for fresh paneer from a reliable store or local dairy because homemade paneer can be a bit softer and inconsistent. If your paneer feels too soft to work with, pop it in the freezer for half an hour—that firms it up nicely and makes cutting easier. For the marinade, you’ll want 200 grams of hung curd (that’s yogurt drained of excess liquid), a tablespoon each of ginger-garlic paste and red chili powder (tweak the chili depending on how spicy you like it), half a tablespoon of turmeric, and a teaspoon each of cumin and coriander powder. Don’t skip the chaat masala or achar masala—that tangy kick really lifts the flavor. And a couple of tablespoons of gram flour (besan) help everything stick to the paneer. Lastly, 1 to 2 tablespoons of mustard oil or any oil with a strong, pungent flavor is key—it gives that distinctive smoky edge you want in your paneer tikka.
A splash of fresh lemon juice from half a lemon and a pinch of kasuri methi (dried fenugreek leaves) really brings out the flavor. I usually start with about a teaspoon of salt, but you can tweak it to your taste. Sometimes, I like to toss in some chopped veggies—like a medium green bell pepper and a medium onion—cut into chunks about the same size as the paneer, so they cook evenly on the skewer. When it comes to yogurt, I’ve tried a few types, but plain full-fat hung curd gives that perfect creamy bite every time. If you're dairy-free or vegan, Greek-style plant-based yogurt is a decent stand-in, though it changes the flavor a bit. I’ve tested these ingredients plenty in my kitchen, and the whole spice mix usually costs around ₹100-150 at a local Indian grocery. The paneer sets you back about ₹250-300 for 400 grams, so it’s a great dish that won’t break the bank.
If you’re curious about making your own paneer, check out my post “How to Make Delicious Homemade Paneer from Scratch”—it’s a game-changer!
How to Cook It Step-by-Step
Let’s start with the paneer. Cut the 400 grams into even cubes about an inch (2.5 cm) across. If you want your cubes to stay firm while grilling, here’s a neat trick: freeze the whole block (still wrapped or in a sealed container) for around 30 minutes before slicing. This makes them less likely to crumble or fall apart. Now, for the marinade, grab a bowl and mix 200 grams of thick hung curd with a tablespoon of ginger-garlic paste. Add in the dry spices—1 tablespoon of red chili powder, half a teaspoon of turmeric, a teaspoon each of cumin, coriander, and chaat masala—plus 2 tablespoons of gram flour. Then pour in 2 tablespoons of mustard oil, the juice of half a lemon, a teaspoon of salt, and a tablespoon of crushed kasuri methi. Stir everything together until the marinade is smooth and thick enough to stick nicely to the paneer—that’s thanks to the gram flour, which acts like a binder.
Now toss your paneer cubes gently into the marinade, making sure each piece is evenly coated without breaking them up. Let them soak in those flavors for at least an hour. From my experience, anywhere between 1 to 4 hours works, but about 2 hours hits the sweet spot—great flavor without the paneer getting too soft on the outside. If you’re pressed for time, even 30 minutes helps, though the taste will be a bit milder. For veggies like bell peppers or onions, either give them a quick toss in the leftover marinade or keep them separate to grill on their own.
Time to fire up your oven or grill. If you’re using the oven, preheat it to 200°C (about 400°F) and line a baking tray with foil for easy cleanup. Thread the paneer and veggies alternately onto skewers—just a heads-up, soak wooden skewers in water for 15 minutes before grilling so they don’t catch fire. Place the skewers on the tray with a little space between them to let the heat circulate evenly. Roast them for around 15-18 minutes. Then switch the oven to grill mode and broil the skewers for 5 minutes to get that beautiful, slightly charred finish that makes all the difference.
If you’re cooking on the stovetop, heat up a non-stick tawa or grill pan over medium-high heat. Add a little oil to keep things from sticking, then toss in the paneer cubes and veggies. Give them a turn every couple of minutes so they cook evenly and pick up a nice char without burning. It usually takes about 12 to 15 minutes total. Just be sure not to overcrowd the pan — otherwise, everything will steam instead of sear.
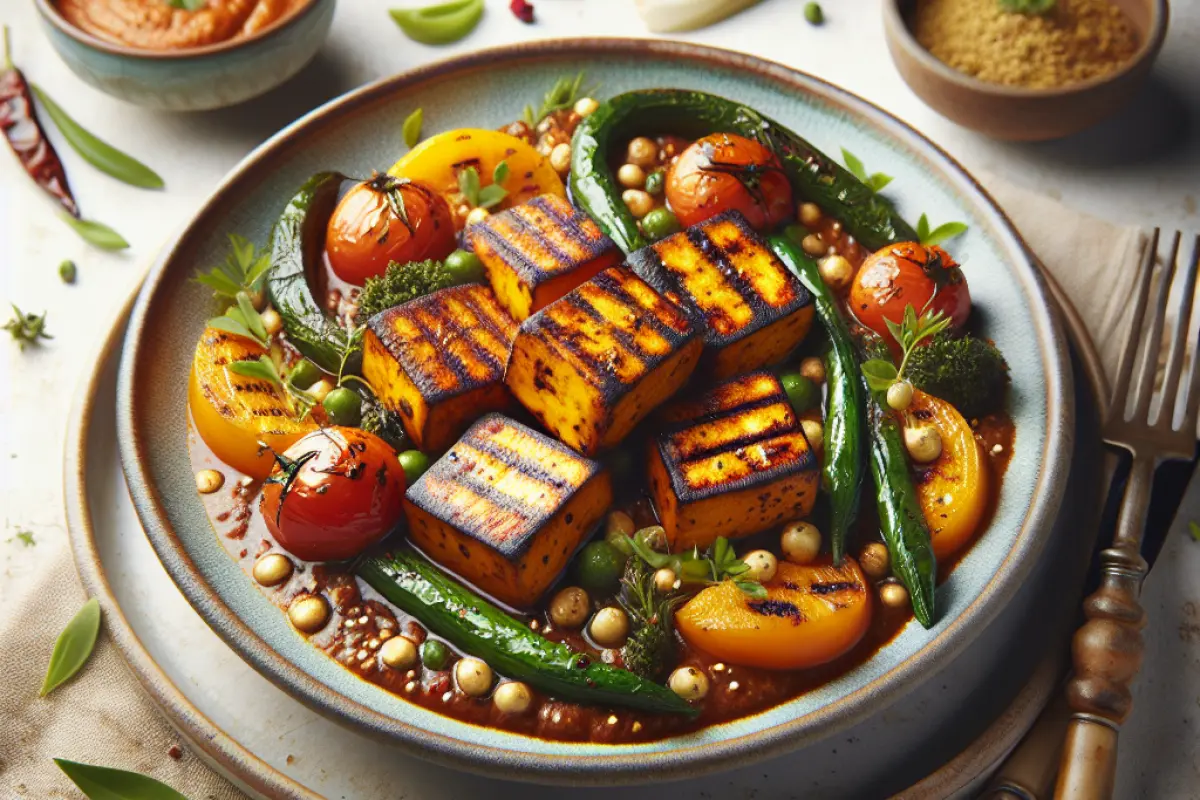
Knowing when the paneer’s done is a bit of a feel thing. You want those golden brown spots or light char marks, not a dull, uniform color. I’ve learned the hard way that overcooking turns the paneer tough and rubbery — definitely not the goal! The ideal is soft and moist on the inside, with a little smoky crust on the outside.
Cooking Tips & Tricks
Getting that perfect charred edge on paneer without drying it out is tougher than it looks. I found it works best to cook on medium to medium-high heat and turn the pieces every couple of minutes. If you crank the heat too high, you’ll be rushing and risk tough paneer. Taking it slow keeps things tender and delicious. The marinade is all about balance — too much yogurt and you end up with a soggy coating, too little spice and it tastes pretty dull. Adding a couple of tablespoons of gram flour really does the trick; it helps the marinade stick better and gives the paneer a nice, crispy crust once grilled.
Skewers are great since they let heat get around all sides evenly. But if you’re using an oven, lining a baking tray with foil and spacing out the paneer and veggies works just as well. Personally, I prefer soaking wooden skewers in water before using them — prevents burning — but metal skewers heat up faster, which can sometimes cook your paneer unevenly. So, wooden ones get my vote when you have the time.
How long you marinate makes a big difference. I experimented with everything from 30 minutes up to 6 hours. Six hours gives you the strongest flavor, no doubt, but the texture can go soft and mushy, which I’m not a fan of. In my experience, around 2 hours is the sweet spot — enough time for the spices to sink in without messing with the paneer’s firmness.
What helped me nail that restaurant-style flavor was a splash of mustard oil and a pinch of kasuri methi—the latter brings this lovely smoky, earthy kick. After trying paneer tikka at several North Indian spots, I noticed this sharp tanginess paired with a little punchiness in the marinade, and this combo really hits that mark.
Mix It Up: Variations and Swaps
Feel free to toss in some colorful veggies like chunks of red, green, or yellow bell peppers and thick onion rings. They not only add a pop of color but also bring a touch of sweetness once grilled, which goes perfectly with paneer. If you want to keep it plant-based, firm tofu works great in the same marinade—just remember it soaks up flavors differently, so I usually let it sit for about three hours.
If you’re after a smokier kick, try tossing in a pinch of smoked paprika or just a tiny drop of liquid smoke—go easy, though, a little goes a long way. On the flip side, if you prefer something tangier, bump up the lemon juice and sprinkle in a bit more chaat masala. It’s all about tweaking it to your taste.
When it comes to heat, you’ve got full control. I usually stick with about a tablespoon of red chili powder for a nice medium kick. Want it softer? Drop it back to a teaspoon. If you’re craving some serious spice, push it up to two tablespoons or throw in some finely chopped green chilies. Just be ready for the burn!
How to Serve and Pair
Paneer tikka is even better when you dunk it in fresh coriander-mint chutney or pile it up with thinly sliced raw red onions, sprinkled lightly with chaat masala or a squeeze of lemon juice. Those lemon wedges aren’t just for show—they cut through the smoky, spicy flavors like a charm. For something to round out the meal, I recommend warm naan, butter roti, or flaky parathas; they soak up all that richness perfectly. If you’re after something simple yet satisfying, smoky roasted cumin rice on the side makes for a fuss-free, one-plate wonder.
When it comes to drinks, a steaming cup of masala chai works wonders with paneer tikka’s spices, but cold mango lassi brings a refreshing sweetness that balances the heat beautifully. And if you’re in the mood for something lighter, a crisp beer never fails. Hosting friends? Try serving paneer tikka on a rustic wooden board with little bowls of different chutneys and pickles—it’s simple, but it makes a great impression and invites everyone to dig in.
Mistakes to Watch Out For
Early on, I made the mistake of marinating paneer for way too long, which turned the outside into a soggy mess. It’s easy to think that the longer you marinate, the better the flavor gets, but after about 4 hours, the texture really takes a hit. Also, I learned that cooking paneer over super high heat can make it tough and rubbery, so it’s all about finding the right balance.
I also found that using super fresh, soft paneer without giving it a bit of prep—like freezing it briefly or pressing out some water—can cause the pieces to fall apart when you try to skewer or cook them. From my experience, taking a little extra time to firm up the paneer before marinating makes a big difference.
One thing I didn’t realize at first was how important it is to drain off the extra marinade before cooking. When the marinade is too wet or still dripping, the paneer ends up soggy instead of grilled nicely. Giving the cubes a gentle shake to get rid of the excess liquid really helps them cook evenly and stay firm.
Smart Storage and Meal Prep Tips
I’ve found that marinated paneer tikka stays fresh in the fridge for about 24 hours before it starts to lose its texture. So, I usually marinate it either the morning of or the night before I plan to cook it. Once cooked, it keeps nicely in an airtight container for a day or two. Just a heads-up—when reheating, skip the microwave if you can. Using a hot pan or oven keeps the paneer from turning rubbery and helps maintain that delicious, slightly charred texture.
When it comes to meal prep, leftover paneer tikka is a winner. I love tossing it into wraps or mixing it into salads with some fresh greens, thinly sliced onions, and a dollop of yogurt dressing—it instantly gives the meal a flavorful boost. It’s a simple way to turn last night’s dinner into a fresh, tasty lunch without any extra hassle.
Dietary Tips and Tweaks
Paneer tikka is naturally gluten-free, as long as your spice mix and gram flour don’t have any hidden wheat. If you’re steering clear of dairy, swapping paneer for firm tofu and using plant-based hung yogurt can do the trick—just be ready for a change in taste and texture. To cut down on fat, try using low-fat Greek yogurt instead of full-fat, and skip the mustard oil, opting for a neutral one. Fair warning: you’ll miss some of that classic, smoky flavor that mustard oil brings.
FAQs
No oven or grill? No problem. A grill pan or a simple tawa on the stove works great. Just keep turning the pieces often so they cook evenly and get that nice, charred edge. It’s a handy trick for anyone cooking in a small kitchen or on the go.
How long should you marinate paneer? I usually let it sit for at least an hour or two. Any longer than about four hours, and the paneer starts to get a bit too soft for my liking, which can change the whole texture when you cook it.
Can you freeze paneer tikka? You can freeze raw paneer before marinating it, no problem. But once it’s marinated, freezing isn’t the best idea — it tends to get soggy. Cooked paneer tikka can be frozen too, but just expect the texture to take a hit.
What’s the best kind of paneer for tikka? Go for firm or extra-firm paneer. I’ve found that popping it in the freezer for a bit before cutting helps it hold its shape while cooking, which makes a big difference on the grill.
Want to make this recipe spicier or tone it down? No problem. Just tweak the amount of red chili powder or toss in some fresh green chilies to get the heat just right for your taste.
To keep paneer from sticking to your skewers or pan, soak wooden skewers in water for about 15 minutes before you start. A quick brush of oil on the pan or grill surface works wonders too, making every piece come off clean and looking perfect.
You can definitely make the marinade ahead of time—up to a day in advance. Just keep it chilled until you're ready. I find it's best to mix the marinade with the paneer right before marinating to keep those fresh flavors popping.
Conclusion
This paneer tikka recipe is one of my go-to’s when I want something flavorful but without spending ages in the kitchen. The spices hit just the right notes, and the step-by-step instructions make it easy enough for any skill level. Whether you’re serving it as a snack or turning it into a full meal, this recipe gives you a great base to start with. Feel free to switch up the veggies or dial the spices up or down—it’s all about making it your own.
If you’re tired of overcomplicated recipes that don’t deliver, this one’s for you. It’s straightforward and based on real cooking experience, so you can actually enjoy making paneer tikka instead of struggling through it. Give it a try—you might just find your new favorite dish.
Don’t forget to subscribe for more easy recipes coming your way, and follow me for fresh cooking ideas every week. I’m really curious to hear how your paneer tikka turns out—or if you put your own twist on it! If you’re interested, you’ll probably like this one next: “Step-by-Step Guide to Homemade Garlic Naan.”
If this topic interests you, you may also find this useful: https://www.cravediary.com/blog/ultimate-best-protein-smoothie-recipe-for-energy-boost